Showing posts with label Vegetarian. Show all posts

Friday, January 25, 2013

Homemade Gnocchi


These days I'm interested in taking a more "homemade" approach to things.  I saw this post on Rouxbe.com's blog and decided this was something I had to try.   

Pronounced Nyoki, these fresh pillows of pasta are fun and easy to make.  These can be made ahead of time and frozen for up to 2 months.

Prep Time:  1-1/2 hours
Cook Time:  5 minutes
Total Time:  About 2 hours
Servings: 4


Cut and rice the potatoes, making sure they don't pile up in one spot
Ingredients:

2 medium Yukon Gold potatoes
1/2 teaspoon kosher salt
2 tsp water

1 cup all-purpose flour
2 large egg yolks
1/4 tsp kosher salt
1/4 tsp freshly-grated nutmeg
1/8 tsp white pepper

4 tbsp unsalted butter
8 fresh sage leaves
1 large pinch kosher salt
1/4 cup Parmigiano-Reggiano (or to taste)

Sprinkle potatoes with a good amount of flour and aerate with a bench scraper
Method:
  • Preheat oven to 400 degrees Fahrenheit.  Place the potatoes onto a sheet of foil, add the salt and water and wrap.  Bake for approximately 40 minutes or until cooked through.
  • Peel the potatoes while they are still hot, cut and rice the potatoes, making sure they don't pile up in one spot.  Let the potatoes cool completely before proceeding.
Continue to cut and gently lift the dough
  • To make the dough, sprinkle the potatoes with a good amount of flour.  Aerate the potatoes with a bench scraper and then add the salt, nutmeg, and white pepper.
  • Break up the egg yolks and pour them over the potatoes.  Cover the surface again with more flour.  Continue to cut and gently lift the dough.
  • Test the dough by gently squeezing it in your hand.  It shouldn't stick.  Add a bit more flour, if needed.
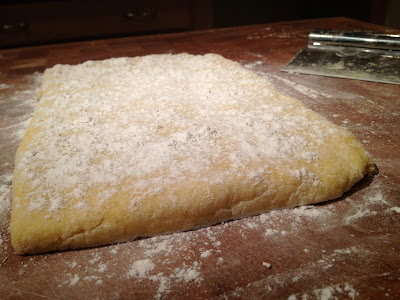
Sprinkle with flour and let the dough rest for about 5 to 10 minutes
  • Once done, shape the dough into a rectangle and fold it a few times, using your fingertips to bring it together.  Flatten the dough out until it is about the thickness of your finger.  Sprinkle with flour and let the dough rest for about 5 to 10 minutes.
Cut strips of dough, about the width of your finger
  • Cut strips of dough, about the width of your finger, and sprinkle the strips with flour so they don't stick to each other.
Cut into 3/4" pieces and separate them slightly and flour them well
  • Roll out each strip and cut the ropes into 3/4" pieces.  Separate them slightly and flour them well so that they don't stick together.
Shape the dough with a gnocchi paddle
  • You can leave the gnocchi as is or you can shape them with a gnocchi paddle.  Shaping the dough makes them look better and also creates a little pocket to capture the sauce.
Shaped gnocchi
  • To cook the gnocchi, bring a pot of cold water to a simmer and add the salt.
  • Gently place the gnocchi into the simmering water, stirring now and again, to make sure nothing is sticking.  Gnocchi only takes a couple of minutes to cook, so as soon as they float to the top, lift them out.
  • Separately melt butter in a sauce pan over medium-low heat.  Add sage leaves and salt.  Toss gnocchi with sage butter and plate.  Sprinkle with Parmigiano-Reggiano and serve.
Gnocchi with warm sage butter sauce
Recipe Links:

Here's a link to the must see full video recipe that this post was stolen from.


Friday, January 11, 2013

Holiday Cake Bites


photo: Joanne Rice
These festive cake bites are a fun and delicious finish to any culinary gathering.  The decorating and arrangement possibilities are endless.  I prepared these for the Christmas Holidays.  They were so well received, they were reprised for the New Year.  

I titled this post "Cake Bites" to stress the difference between this technique and that used for the traditional yet similar "Cake Pops".  

Cake pops are made with prepared cake which has been crumbled, mixed with frosting, chilled, and then and formed into balls.  In my opinion, this approach results in a product overly sweet, dense, and hard to the bite.  This is also a lot of work.

Baked directly into their spherical shapes, these cake bites present succulent bites of cake.  The perfect serving size and the perfect amount of sweetness.  These are frosted with a simple and traditional butter based cake frosting.


Prep Time:   15 minutes
Cook Time:  30 minutes
Total Time:   2-1/2 hours (includes decorating and wait time)
Servings:     about 24 cake bites

Special Equipment:  cake pops pan

Cake Bites Ingredients: 

3/4 cup (125 g) semi-sweet chocolate chips
1/2 cup (120 g) butter
3/4 cup (150 g) sugar
3 tablespoons (20 g) cocoa
2 eggs
3/4 cup (90 g) flour
1/4 teaspoon salt
24 lollipop sticks
1/4 cup light cocoa candy melts

cake frosting
assorted sprinkles


Method:


  • Preheat oven to 325 degrees F.  Grease pan; set aside.
  • In medium saucepan, over low heat, melt chocolate chips and butter together; stir until smooth.
  • Remove from heat and pour into medium bowl.
  • Add sugar and cocoa; mix until blended.
  • Add eggs, one at a time, mixing well after each addition.
  • Add flour and salt; stir until blended.
  • Spoon batter into bottom half of pan (without holes) filling each so that it mounds over the top of the pan.
  • Place top half of pan on top and secure with keys.
  • Bake for 16-18 minutes, until toothpick inserted comes out almost clean.
  • Cool 5 minutes in pan, remove cake bites from pan to cool completely.


  • Cool 5 minutes in pan, remove cake bites from pan to cool completely.
  • Melt candy melts according to package directions.
  • Dip lollipop sticks into stick into candy melts and insert into cakes; repeat with all cakes.
  • Allow melts to cool to secure stick in place.


  • Once cooled, frost with your favorite frosting, and decorate with sprinkles.
  • Serve in any arrangement you choose.


Recipe Links:

Here is a Cake Pops Baking Pan video showing the entire baking and decorating process.


Grab them while the gettin's good!


Saturday, October 20, 2012

Potato Dressing


Recently, while daydreaming about this year's upcoming Thanksgiving turkey dinner, my mind wandered to a place, a place with a de-boned, slow cooked, fully stuffed version of the traditional family fare... 

I wanted a unique stuffing recipe to pull this off.  Most stuffings are fully cooked when initially mixed, and just need to be heated through.  I wanted one that would cook along with the bird and hopefully finish after 8 hours of cooking. 

This recipe started as an experiment, a "test run" so to speak.  Based on a "Traditional Potato Stuffing" posted by Kay Johnson on her blog "...and then I ate it!", this version is unique in that instead of using prepared mashed potatoes, I used parboiled and diced potatoes instead.

Prep Time:  20 minutes
Cook time:  45 minutes
Servings:  8


Ingredients:

1 teaspoon oil
1 teaspoon butter to sauté plus more for topping
1 large onion, diced
2 stalks celery, diced
3/4 teaspoon poultry seasoning
1/2 teaspoon salt
1/2 teaspoon black pepper
3 russet potatoes
3 cups bread, torn into 1/2" pieces
1/2 cup of chicken broth


Tip: Slicing potatoes lengthwise allows your potatoes to cook evenly. 

Dice potato halves into 1/4 inch pieces
Fully prepped potatoes

Method:


  • Peel potatoes and slice in half lengthwise.  Parboil in salted water for 15 minutes or so until 2/3 done.  Drain potatoes and place in the refrigerator to cool.  Once cool, cut the potato halves lengthwise and crosswise into 1/4" pieces.  Place in a large bowl.
  • In a skillet over medium high heat, add the oil and butter.  When the butter is melted, add onions and celery, sauté until almost softened 3-5 minutes.  Add in the spices, stir and continue to sauté until everything is soft and translucent, about another three minutes.
  • Hand tear the bread into 1/2" pieces. Place in the large bowl with the potatoes. 
  • Add the celery/onion/spice mixture to the potato/bread mixture and toss until incorporated.
  • Pour the broth over the mixture and toss again.  The broth will disappear into the bread.  Remember there is still moisture in the potatoes which will be released as the stuffing cooks.
  • Place all of the stuffing in an oil sprayed baking dish.  Place a few pats of butter on the top.  Leave the tops rough to brown.  Bake @ 350 degrees F for 35-45 minutes or until crisp brown on the top.


Recipe Links:

Here's the original "Traditional Potato Stuffing" recipe that served as the basis for this dish.

Here's a link to a crazy slow cooked bird video that inspired my Thanksgiving daydream.


Sunday, October 14, 2012

The Devil's Cupcakes


The original recipe for these cupcakes came to my in-box as "Coffee Kahlua Cupcakes". Little did I know that it was stolen from Paula Dean before it got to me...  Paula calls her version "Chocolate Cupcakes with Coffee Cream Filling".
My spin finishes with some dusted on cocoa and tuxedo chocolate covered expresso beans. 


These cupcakes are devilishly good
Prep Time:  25 Minutes
Cook Time:  40 minutes
Servings:  24-30 cupcakes

Ingredients:

Cupcakes:
2 1/4 cups all-purpose flour
2 cups sugar
3/4 cup unsweetened cocoa powder
1 1/2 teaspoons baking soda
1 teaspoon baking powder
1/2 teaspoon salt
1 cup vegetable oil
1 cup strong brewed coffee, cooled
3 large eggs
1 (8-ounce) container sour cream
1 teaspoon vanilla extract

Coffee Cream Filling:
1 (3-ounce) package cream cheese, softened
2 teaspoons unsweetened cocoa powder
1/4 cup coffee flavored liquor
1 (8-ounce) container frozen whipped topping, thawed

Coffee Buttercream Frosting:
1/2 cup butter, softened
3 cups confectioners' sugar
1/4 cup strong brewed coffee

Combine the dry cupcake ingredients before adding the oil, coffee, and eggs
Method (Cupcakes):
  • Preheat the oven to 350 degrees F.  Line muffin pans with paper liners and set aside.
  • In a large bowl, whisk flour, sugar, cocoa powder, baking soda, baking powder, and salt.  Add oil, coffee, and eggs.  Beat at medium speed with an electric mixer until smooth.  Mix in the sour cream and vanilla.
  • Spoon batter evenly into prepared muffin cups, filling each 2/3 full.  Bake until a tester inserted in the center comes out clean, for 16-18 minutes.  Let them cool in pans on wire racks for 5 minute.  Remove from the pans and cool completely on wire racks.
  • While cupcakes are cooling, prepare the Coffee Cream Filling (see below).  Pipe about a tablespoon of the filling into the center of each cupcake.  A simple plastic straw taped to a piping tip makes easy work of this.
  • Spread the Coffee Buttercream Frosting evenly over the cupcakes and dust the cakes with unsweetened cocoa and garnish with chocolate covered expresso beans.
A quick clip showing filling the cupcakes

Method (Coffee Cream Filling):
  • In a small bowl, whip the cream cheese at medium speed with an electric mixer until smooth.  Add the cocoa powder and whip to incorporate.  Slowly add the liquor and fold in the whipped topping.  Cover and chill.
Method (Coffee Buttercream Frosting):
  • In a medium bowl, beat the butter at medium speed with an electric mixer until creamy. Gradually add the confectioners' sugar, beating until smooth, then beat in the coffee.


Recipe Links:

Here's the Coffee Kahlua Cupcakes version from the Just a Pinch Recipes website.

Here's the original Paula Dean version.


Tuesday, October 11, 2011

Creme Filled Cupcakes


Inspired by one of my son's schoolmates, these creme filled cupcakes are fun and easy to make.  

Prep Time:  30 minutes
Total Time:  about 2 hours
Servings:  24


Ingredients:

1 package (18-1/4 ounces) cake mix, any variety
Prepared frosting, any variety
1/2 cup (1 stick) unsalted butter (room temperature)
1 1/2 cups (7.5 ounce jar) marshmallow creme

Method:

  • Preheat oven to 350 degrees
  • Prepare cake mix batter according to the package directions for cupcakes
  • Bake until a toothpick inserted in center of a cupcake comes out clean
  • Cool for 5 minutes before removing from pans to wire racks to cool completely


While cupcakes are baking in the oven prepare the filling

  • In a medium bowl, whisk marshmallow creme and butter until smooth
  • Chill until slightly firm, 15 to 30 minutes
  • Once cupcakes have cooled you can inject the filling
A plastic straw taped to a piping tip makes filling the cakes a breeze
  • Transfer filling mixture into a piping bag fitted with a special piping tip (see above).
  • Insert tip into the top of each cupcake and squeeze to fill.  You will see the top of the cupcake bulge a little.  Some practice will help you determine how much to put in - Too much will crack the top and you could explode your cupcake.
  • You can use the remaining filling to decorate the tops of the cupcakes or just use a prepared frosting as I did here.


Recipe Links:


Here's the original post which gave me the inspiration for the filling.


Thursday, July 21, 2011

Frijoles Negros - Cuban Black Beans


I've had this bag of dried black beans in my cupboard for a while now.   This weekend I decided to give those beans some life, Cuban style.  Very simple, flavorful, mild, and delicious. 


Prep Time:  20 Minutes
Soaking Time:  6-8 hours or overnight
Cooking Time:  1-1/2 to 2 hours
Servings:  12


Ingredients:


1 pound of dry black beans, picked over and rinsed
2 bay leaves
1 white onion - diced
4 cloves of garlic - mashed
2 tablespoons of extra virgin olive oil
1-1/2 teaspoons ground cumin
1 teaspoon salt
1 tablespoon sugar
1 splash balsamic vinegar


Mash the garlic with a mortar and pestle - add a pinch of salt while mashing.
The salt keeps the garlic from jumping out of the mortar.
Method:

Soak dried beans in water overnight
After soaking, the water should be a dark, inky black

  • Soak the beans overnight in 8 cups of water in a large soup pot.
  • Add bay leaves to the beans and bring to a boil; cover, reduce heat, and simmer 1-1/4 hours, or until the beans are very tender.
    The onions, garlic, and cumin create the seasoning or "sazon"
  • After the beans have cooked for an hour, heat the oil in a large skillet over medium low heat; add the onions, garlic, cumin, and salt. Sweat the onion and then simmer gently covered for 15 to 20 minutes, or until the onions are tender.
  • Add the cooked onion mixture (sazon), sugar, and vinegar to the beans; cover and simmer gently for 20 minutes.  
  • While simmering, take a potato masher and crush some of the beans in the pot. This thickens the juice.
  • Serve over cooked rice.


Recipe Links:

Here is the original video recipe which inspired the theme and seasoning for the dish.

Here is a link to the written piece which provided the structure of the dish.

Here's a link to the coolest building around.


Monday, April 25, 2011

Sliced Baked Sweet Potatoes


These Sliced Baked Sweet Potatoes were a fun and delicious accompaniment to the Ham dinner we had for Easter.  Each potato is an individual serving and offers the pre-cut perfection of scalloped potatoes without the added fat and calories.

Prep Time:  15 minutes
Cooking Time:  about 45 minutes
Servings:  4


Ingredients:

4 medium sweet potatoes
1 teaspoon salt
2 to 3 tablespoons melted butter
2 tablespoons of chopped fresh herbs or 2 teaspoons of dried herbs
      I used a fresh blend of parsley, sage, rosemary, and thyme
3 tablespoons grated sharp cheddar cheese
1-1/2 tablespoons grated parmesan cheese


Method:
  • Peel potatoes and rinse them.
  • Preheat oven to 425 degrees.
  • Cut potatoes into thin slices but not all the way through.
  • Put potatoes in a baking dish.  Fan them slightly.
  • Sprinkle with salt and drizzle with butter.  
  • Sprinkle with herbs.
  • Bake potatoes for about 30 minutes.
  • Remove from oven.  Sprinkle with cheeses.
  • Bake potatoes for another 10 to 15 minutes until lightly browned, cheeses are melted and potatoes are soft inside.  Check with a fork.


Recipe Links:

I found the original recipe in a box of cookbooks handed down to me from my Mother-In-Law. It was printed on a a recipe card and was being used as a book mark. 


Sunday, March 27, 2011

The Mysterious Eddie B's Pancakes


This delicious Pancake recipe came to me via my inbox.  As you can imagine, I get a lot of the "You need to try this..." type email.  Last Friday, I was forwarded the message below, without anything further to go by...


I went online, Googled "Eddie B", and did my best to find the source of this recipe.  No Luck.  Nonetheless, we decided to give it a try.  The dish turned out so good, that I decided to go ahead and Post.  If you know who "Eddie B" is, please let me know, so that I could give credit where credit is due.

In this version, "B" is for Blueberries.
April 2011 Update:  
Eddie is from California and offers the following links:
The Produce Exchange
We Only Pick the Best


Related Posts Plugin for WordPress, Blogger...